Table of Contents
Open Table of Contents
- Introduction
- Authentication
- What is JWT?
- Diagramming the Flow
- Implementation
- Step 1: Setting Up the Server
- Step 2: Setting Up Our Constants and Storage
- Step 3: Creating Helper Functions
- Step 4: Creating the Authentication Middleware
- Step 5: The Authentication Route
- Step 6: The Refresh Route
- Step 7: The Protected Route
- Step 8: Starting the Server
- Step 9: Testing Our Implementation
- What We’ve Built
Introduction
I’ve learned about JWT authentication many times, but without practicing it, I often forgot the details when it came time to re-implement it. This post aims to be the definitive guide on implementing JWT authentication, specifically using access tokens and refresh tokens, providing a clear, working approach.
Note
Please, don't take it as the only way to implement JWT authentication. This is just a guide to help you understand the process and how to implement it. There are many other ways to implement JWT authentication, and you should choose the one that best suits your needs.
Before diving into the implementation, let’s understand the core problem we’re trying to solve: Authentication.
Authentication
First, what exactly is authentication?
People often confuse authentication with authorization. Let’s clarify:
- Authentication is the process of proving you are who you claim to be.
- Authorization is the process of proving you have the right to do what you’re asking.
While distinct, authentication and authorization often go hand-in-hand. When you identify who is requesting a resource, you usually also want to know if they have permission to access it. So, in practice, you’re likely handling both simultaneously.
In this article, we won’t dive deep into authorization. Instead, we’ll focus on a practical example of implementing authentication using JavaScript (technically TypeScript, but don’t worry, it won’t bite).
What is JWT?
JWT stands for JSON Web Token. It’s a widely used, open standard for securely transmitting information between parties as a JSON object, and it’s commonly used for user authentication as well.
JWT addresses the challenge of stateless authentication, a common requirement for many modern applications where the server doesn’t maintain session data between requests. Instead, all necessary user information is contained within the token itself. This makes scaling much easier, as any server can process a request without needing shared session state.
A JWT is composed of three parts, separated by dots (.):
- Header: Contains metadata about the token, such as its type (JWT) and the signing algorithm used (e.g., HMAC SHA256 or RSA).
- Payload: Holds the actual data, known as “claims”. These can include user ID, name, email, roles, and other custom data.
- Signature: A cryptographic hash of the header and payload. It’s generated using a secret key (or a private key if using asymmetric algorithms).
For example, here’s a sample JWT that was created when I logged in to my Vercel account:
Token
eyJhbGciOiJIUzI1NiIsInR5cCI6IkpXVCJ9.eyJzdWIiOiIxMjM0NTY3ODkwIiwidGl0bGUiOiJZb3UgdGhvdWdodCIsImRlc2NyaXB0aW9uIjoiSnVzdCBiZWNhdXNlIHlvdSB0b29rIHlvdXIgdGltZSB0byBjaGVjayBpZiBpdCB3YXMgYSByZWFsIHRva2VuLCBJIGhhdmUgYSBzcGVjaWFsIGdpZnQgZm9yIHlvdTogaHR0cHM6Ly9kdWIuc2gvWW15QjdOZSIsImlhdCI6MTUxNjIzOTAyMn0.ApAj_Uxzc-Y0OLjcHpu3BZFc3nt2rz1r5o4T_IdciWMHeader
eyJhbGciOiJIUzI1NiIsInR5cCI6IkpXVCJ9
Payload
eyJzdWIiOiIxMjM0NTY3ODkwIiwidGl0bGUiOiJZb3UgdGhvdWdodCIsImRlc2NyaXB0aW9uIjoiSnVzdCBiZWNhdXNlIHlvdSB0b29rIHlvdXIgdGltZSB0byBjaGVjayBpZiBpdCB3YXMgYSByZWFsIHRva2VuLCBJIGhhdmUgYSBzcGVjaWFsIGdpZnQgZm9yIHlvdTogaHR0cHM6Ly9kdWIuc2gvWW15QjdOZSIsImlhdCI6MTUxNjIzOTAyMn0
Signature
ApAj_Uxzc-Y0OLjcHpu3BZFc3nt2rz1r5o4T_IdciWM
Why is the Signature Important?
The signature is crucial for ensuring the token’s integrity. When a JWT is received, the server uses its secret key to verify that the token hasn’t been altered and was indeed issued by a trusted source. If someone tries to tamper with the header or payload, the signature validation will fail, and the token will be rejected.
This makes JWT a powerful tool for building secure authentication systems, as it prevents malicious actors from forging or modifying tokens.
Diagramming the Flow
Now that we understand what we want to achieve and what JWT is, let’s visualize the process at a high level.
The core problem is simple: we need a reliable way to identify who is trying to access a resource. This resource could be anything, a file, sensitive data, etc.; its specific nature doesn’t matter here.
One common and secure approach is to use access tokens and refresh tokens. You might wonder, what are these tokens, and why do we need both?
Access tokens are used to identify the user making a request to a protected resource. Refresh tokens are used to “renew” a user’s access. We need this “renewal” mechanism for security. We don’t want users to remain logged in indefinitely without interaction because long-lived sessions are more vulnerable to session hijacking, where an attacker could obtain a token and impersonate the user for an extended period.
Another benefit of refresh tokens is that when a user requests a token refresh, your server receives information like their IP address and device details. This data can be used to detect suspicious activity, adding another layer of security.
The general approach involves creating a refresh token every time an access token is issued. This refresh token is only visible to the server and is stored securely.
When a user requests a private resource, we validate their access token. If the access token has expired, we allow the client to request a new access token using their refresh token via a dedicated endpoint.
Authentication Flow
Here’s a visual representation of the initial authentication flow:
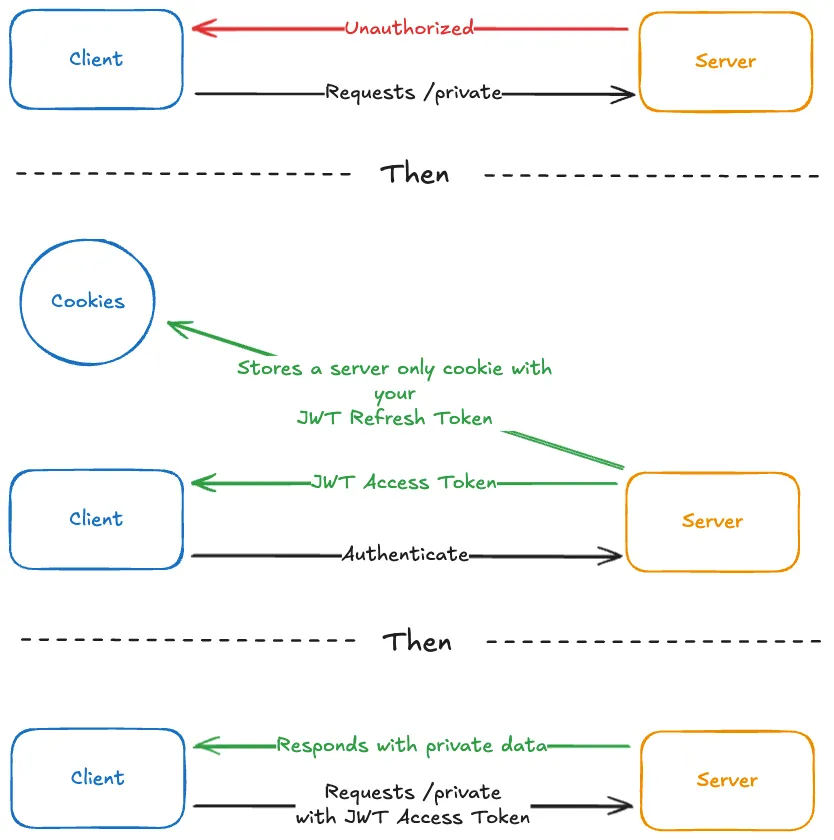
What’s happening in the diagram:
- You attempt to access a private resource.
- Since you’re unauthenticated, the server returns a
401 Unauthorizedstatus code. - To authenticate, you send your credentials (e.g., email and password) to the server.
- The server validates your credentials and, if valid, returns a JWT access token. You’ll typically store this access token in-memory on the client-side for future requests. The server also generates a refresh token and saves it in a server-side only HTTP-only cookie.
- For subsequent requests to private resources, you include the access token (usually in the
Authorizationheader). - The server validates the access token and, if valid, returns the requested resource.
In this diagram, the refresh token isn’t actively used. This might make you wonder why we need it.
Remember when I said, “if their token is expired, we allow them to refresh their access token…”? That’s because access tokens are usually short-lived (typically 15 minutes), while refresh tokens are long-lived (depending on your use case, they might last a day, a week, a month, or longer). We cannot rely on the access token to be valid for an extended period.
Requiring the user to re-authenticate every 15 minutes would be a terrible user experience. This is where the refresh token comes in. The refresh token proves to the server that you’re still the same authenticated user, even if your access token has expired. Instead of fully re-authenticating, you can simply refresh your access token using your refresh token.
Refresh Flow
Here’s a visual representation of the token refresh flow:
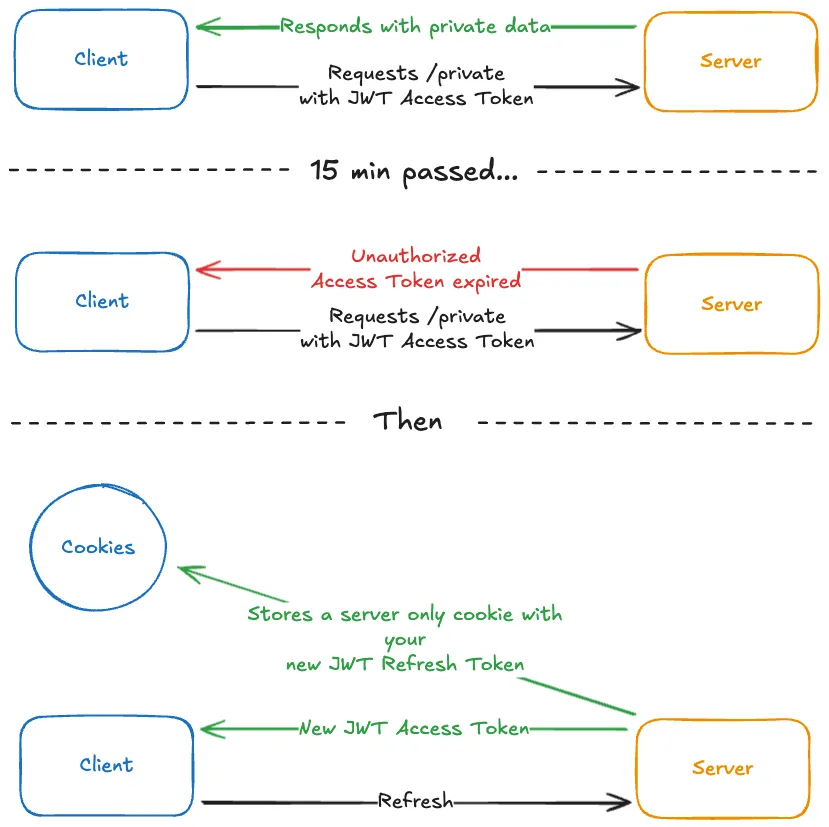
What’s happening in the diagram:
- You were successfully authenticated and able to access your private resources.
- Time passes (e.g., 15 minutes), and your access token expires.
- You send another request to the server for a private resource, and you receive a
401 Unauthorizedstatus code. - You then call a dedicated endpoint to refresh your access token. The browser automatically sends the HTTP-only refresh token cookie.
- The server validates your refresh token. If valid, it generates and returns both a new access token and a new refresh token. The new refresh token is again saved in a server-side only HTTP-only cookie, replacing the old one.
- You store the new access token in-memory on the client-side, ready to access private resources again.
By issuing a new refresh token with each refresh, you implement a “sliding window” for sessions. This is a security best practice: if an old refresh token is compromised, it becomes invalid after the next refresh, limiting the attacker’s window of opportunity.
Implementation
Now that we understand the flow, let’s implement it!
For this implementation, we’ll use Fastify, a fast and lightweight web framework for Node.js. Fastify provides a great API for everything we’ll need in this example:
- Creating a server
- Defining different routes
- A great plugin for cookie handling (
@fastify/cookie) - A great plugin for JWT operations (
@fastify/jwt)
We’ll create a private route that requires a valid access token. We’ll also build two other routes: one for initial authentication (login) and one for refreshing the access token. To keep the example simple, we won’t implement a user registration route, but you could easily integrate it with your preferred database.
First, let’s set up our package.json with all the necessary packages for this demo:
{
  "name": "fastify-jwt-auth-example",
  "version": "1.0.0",
  "description": "Simple Fastify JWT authentication example",
  "main": "index.js",
  "scripts": {
    "start:dev": "tsx watch index.ts",
    "build": "tsc",
    "start": "node dist/index.js"
  },
  "author": "Nicholas Costa",
  "dependencies": {
    "@fastify/cookie": "^11.0.2",
    "@fastify/jwt": "^9.1.0",
    "fastify": "^5.3.3",
    "typescript": "^5.8.3"
  },
  "devDependencies": {
    "@types/node": "^24.0.1",
    "tsx": "^4.20.3"
  }
}
Now, install these dependencies:
npm installStep 1: Setting Up the Server
Let’s create our main server file, index.ts, and begin with the basic setup:
import Fastify, { FastifyRequest, FastifyReply } from 'fastify';
import cookie from '@fastify/cookie';
import jwt from '@fastify/jwt';
import { randomUUID } from 'node:crypto';

const fastify = Fastify({ logger: true });

// Register plugins
fastify.register(cookie);
fastify.register(jwt, {
  secret: 'your-jwt-secret-key' // In production, use environment variables
});
Here’s what’s happening:
- We’re importing
Fastifyalong withFastifyRequestandFastifyReplytypes for better TypeScript support, and the two necessary plugins:@fastify/cookiefor handling cookies and@fastify/jwtfor JWT operations. - We’re creating a Fastify instance with logging enabled, which will help us see what’s happening.
- We’re registering both plugins. The JWT plugin requires a secret key that will be used to sign and verify our tokens.
- We’re importing the
randomUUIDfunction from thenode:cryptomodule to generate unique IDs for our tokens.
Important note: In a real application, never hardcode your JWT secret. Always use environment variables to keep it secure and separate from your codebase!
Step 2: Setting Up Our Constants and Storage
Next, let’s add some constants and a simple in-memory storage for our demo:
// Fixed credentials for demo
const VALID_EMAIL = 'john@doe.com';
const VALID_PASSWORD = '123456';

// In-memory store for refresh tokens (in production, use a database like Redis or PostgreSQL)
// In a real application, you would associate these tokens with a user ID and manage their revocation.
const refreshTokens = new Set<string>();
For this example, we’re using hardcoded credentials for simplicity. In a real application, you’d validate these against a database with properly hashed and salted passwords.
The refreshTokens set will temporarily store our refresh tokens. In a production environment, you would store these in a persistent database like Redis (for fast lookups) or PostgreSQL, typically associating them with a specific user and potentially a device ID for better session management and revocation.
Step 3: Creating Helper Functions
Let’s create a helper function to generate our tokens:
// Helper function to generate tokens
function generateTokens(userId: string) {
  const accessToken = fastify.jwt.sign(
    { userId, type: "access", id: randomUUID() },
    { expiresIn: '15m' }
  );

  const refreshToken = fastify.jwt.sign(
    { userId, type: 'refresh', id: randomUUID() },
    { expiresIn: '30d' }
  );

  return { accessToken, refreshToken };
}

// Helper function to remove a token from the refreshTokens set
function removeRefreshToken(refreshToken: string) {
  refreshTokens.delete(refreshToken);
}
This function creates both tokens with distinct expiration times:
- Access token: 15 minutes (short-lived, ideal for frequent requests)
- Refresh token: 30 days (long-lived, used less frequently for session renewal)
Note
We're using a Set to store the refresh tokens. This is a simple but effective way to store the refresh tokens, preventing duplicates and making it easy to check if a token is in the set.
Warning
Notice that we're also adding an ID to the tokens. This is a simple way to ensure each token is unique. Without the ID, creating two tokens at the same second would result in identical tokens, since the hash is generated from the header and payload, if those are the same, the hash will be the same as well.
Step 4: Creating the Authentication Middleware
Now, let’s create a middleware function to protect our private routes. We’ll create an async function called verifyJwt to validate the access token using the jwtVerify method provided by @fastify/jwt.
async function verifyJwt(request: FastifyRequest, reply: FastifyReply) {
  try {
    await request.jwtVerify();
  } catch (error) {
    return reply.status(401).send({ message: "Unauthorized" });
  }
}
The @fastify/jwt plugin automatically adds a jwtVerify() method to the request object. When called, it will:
- Look for the JWT token in the
Authorizationheader (e.g.,Bearer <token>). - Verify the token’s signature using the secret key.
- Parse the payload and attach it to
request.user(e.g.,request.user.userIdwill beuser123).
If any of these steps fail (e.g., token missing, invalid signature, expired token), it throws an error. We catch this error and return a 401 Unauthorized response to the client.
Step 5: The Authentication Route
Time to create our /auth route, which users will hit to authenticate themselves:
// Route 1: Authentication
fastify.post('/auth', async (request: FastifyRequest, reply: FastifyReply) => {
  const { email, password } = request.body as { email: string; password: string };

  // Simple credential check (replace with database validation in production)
  if (email !== VALID_EMAIL || password !== VALID_PASSWORD) {
    return reply.status(401).send({ message: 'Invalid credentials' });
  }

  // Generate tokens
  const { accessToken, refreshToken } = generateTokens('user123');

  // Store refresh token (in a real app, this would be in a DB, associated with a user)
  refreshTokens.add(refreshToken);

  // Set refresh token as httpOnly cookie
  reply.setCookie('refreshToken', refreshToken, {
    httpOnly: true, // Prevents client-side JavaScript from accessing the cookie
    secure: false, // Set to true in production with HTTPS for secure transmission
    sameSite: 'strict', // Protects against CSRF attacks
    maxAge: 30 * 24 * 60 * 60 * 1000 // 30 days in milliseconds
  });

  return { accessToken };
});
Let’s break down what’s happening here:
- Credential validation: We check if the provided email and password match our hardcoded values. In a real application, this would involve querying a user database and comparing hashed passwords.
- Token generation: If credentials are valid, we generate both an access token and a refresh token for the user.
- Refresh token storage: We store the refresh token in our in-memory set. We also set it as an HTTP-only cookie in the response.
- Response: We return only the access token to the client. The refresh token is kept secure in the HTTP-only cookie.
Why do we set the refresh token as an HTTP-only cookie? This is an important security measure. HTTP-only cookies cannot be accessed by client-side JavaScript, which significantly protects against XSS (Cross-Site Scripting) attacks. Even if an attacker injects malicious JavaScript into your page, they won’t be able to steal the refresh token. Additionally, setting sameSite: 'strict' helps mitigate CSRF (Cross-Site Request Forgery) attacks by preventing the browser from sending the cookie with cross-site requests.
Step 6: The Refresh Route
Now let’s create the /auth/refresh route, which will be used to refresh the access token when it expires:
// Route 2: Refresh token
fastify.post('/auth/refresh', async (request: FastifyRequest, reply: FastifyReply) => {
  const refreshToken = request.cookies.refreshToken;

  // 1. Check if refresh token exists and is known to the server
  if (!refreshToken || !refreshTokens.includes(refreshToken)) {
    return reply.status(401).send({ message: 'Invalid refresh token' });
  }

  try {
    // 2. Verify the refresh token
    const decoded = fastify.jwt.verify(refreshToken) as { userId: string; type: string };

    // 3. Ensure it's explicitly a refresh token (prevents using an access token here)
    if (decoded.type !== 'refresh') {
      return reply.status(401).send({ message: 'Invalid refresh token type' });
    }

    // 4. Invalidate the old refresh token (single-use refresh tokens for better security)
    removeRefreshToken(refreshToken);

    // 5. Generate new access and refresh tokens
    const { accessToken, refreshToken: newRefreshToken } = generateTokens(decoded.userId);

    // 6. Store the new refresh token
    refreshTokens.add(newRefreshToken);

    // 7. Set the new refresh token as an httpOnly cookie, replacing the old one
    reply.setCookie('refreshToken', newRefreshToken, {
      httpOnly: true,
      secure: false, // Set to true in production with HTTPS
      sameSite: 'strict',
      maxAge: 30 * 24 * 60 * 60 * 1000 // 30 days
    });

    return reply.status(200).send({ accessToken });
  } catch (error) {
    // Catch errors during JWT verification (e.g., token expired, tampered)
    return reply.status(401).send({ message: 'Invalid refresh token' });
  }
});
This route performs several crucial steps:
- Retrieves the refresh token from the HTTP-only cookie sent by the browser.
- Validates the token’s existence and checks if it’s in our stored
refreshTokensset (this is where a database lookup would occur in a real app). - Verifies the JWT’s signature and expiration, then checks if its payload
typeis'refresh'. This prevents an expired access token from being mistakenly used as a refresh token. - Removes the used refresh token from our storage to enforce a single-use token pattern. This limits the window in which a stolen token could be reused. While this doesn’t stop an attacker from using a token if they get to it first, it ensures the same token can’t be used more than once.
- Generates new access and refresh tokens. Since the user successfully proved they are still active with a valid refresh token, we issue fresh tokens to extend their session.
- Stores the newly generated refresh token.
- Sets the new refresh token as an HTTP-only cookie, replacing the old one.
- Returns only the new access token to the client.
Step 7: The Protected Route
Finally, let’s create our /private route that requires authentication via a valid access token:
// Route 3: Protected route
fastify.get('/private', {
  preHandler: [verifyJwt] // Use our custom verifyJwt function
}, async (request: FastifyRequest, reply: FastifyReply) => {
  // request.user is populated by fastify.jwt.verify()
  const user = request.user as { userId: string; iat: number; exp: number };
  return {
    message: 'This is a protected route!',
    user: user
  };
});
The magic here is in the preHandler option. This tells Fastify to execute our verifyJwt function before the main route handler. If verifyJwt throws an error (because the token is missing, invalid, or expired), the route handler never runs, and a 401 Unauthorized response is sent. If verifyJwt succeeds, request.user will be populated with the decoded JWT payload, allowing you to access user information within your route handler.
Step 8: Starting the Server
Let’s add the code to start our Fastify server:
// Start server
const start = async () => {
  try {
    await fastify.listen({ port: 8080, host: '0.0.0.0' });
  } catch (err) {
    process.exit(1);
  }
};

start();
Step 9: Testing Our Implementation
Now, let’s test our JWT authentication system!
First, start the server using the start:dev script we defined in package.json:
npm run start:devTest 1: Try accessing the protected route without authentication
Open a new terminal and run:
curl -X GET http://localhost:8080/privateYou should receive a 401 Unauthorized response:
{"message": "Unauthorized"}Perfect! Our protection is working as expected.
Test 2: Authenticate and get an access token
Now, let’s log in. This command will send your credentials and save the HTTP-only refresh token to a file named cookies.txt:
curl -X POST http://localhost:8080/auth \
  -H "Content-Type: application/json" \
  -d '{"email": "john@doe.com", "password": "123456"}' \
  -c cookies.txt
You should get a JSON response containing your access token:
{"accessToken": "eyJhbGciOiJIUzI1NiIsInR5cCI6IkpXVCJ9..."}The -c cookies.txt flag saves the cookies (including our refresh token) to a file named cookies.txt. This simulates how a browser would automatically store and send HTTP-only cookies.
Test 3: Access the protected route with the access token
Copy the accessToken from the previous step and use it in the Authorization header:
curl -X GET http://localhost:8080/private \
  -H "Authorization: Bearer YOUR_ACCESS_TOKEN_HERE"
Replace YOUR_ACCESS_TOKEN_HERE with the actual access token you received. You should now get access to the private resource:
{
  "message": "This is a protected route!",
  "user": {
    "userId": "user123",
    "iat": 1640995200, // Example timestamp
    "exp": 1640996100  // Example timestamp
  }
}
Success! You can now access the protected route.
Test 4: Refresh your access token
After your access token expires (or to simulate a refresh), use the refresh token stored in cookies.txt to get a new pair:
curl -X POST http://localhost:8080/auth/refresh \
  -b cookies.txt
The -b cookies.txt flag sends the cookies we saved earlier (which contains the refresh token). You should receive a new access token:
{"accessToken": "eyJhbGciOiJIUzI1NiIsInR5cCI6IkpXVCJ9..."}And behind the scenes, a new refresh token has been set in your cookies.txt file, replacing the old one.
What We’ve Built
Congratulations! You’ve successfully built a complete JWT authentication system with:
- Access tokens (15-minute expiration) for securing requests.
- Refresh tokens (30-day expiration, stored as secure HTTP-only cookies) for maintaining user sessions without constant re-authentication.
- Protected routes that require valid authentication.
- A token refresh mechanism to extend user sessions securely.
What’s nice about this implementation is that it’s stateless (for access token validation) while providing secure session management through refresh tokens. While we used in-memory storage for this demo, remember that in a production environment, you would integrate a persistent database to manage refresh tokens.
Thank you for reading until the end, I hope you found this article helpful and it helps you implement it on your own projects.
Here’s the full code for the project: nicholascostadev/fastify-jwt-auth-example. The code there is a bit more complex because I’ve implemented tests to ensure it’s all working and I improved the type definitions, but the core logic is the same.